 |
Language:
Epson ESC/P2 Speed: 198 CPS - LQ 12 CPI Graphics: 60, 180, 360dpi InkJet Technology |
Internal Fonts
| Typeface | Quality | Height | Pitch |
| Draft | Draft | 7 pt | 15 CPI |
| Draft | Draft | 10.5 pt | 10 or 12 CPI |
| Courier | LQ | 7 pt | 15 CPI |
| Courier | LQ | 10.5 pt | 10 or 12 CPI |
| Roman | LQ | 7 pt | 15 CPI |
| Roman | LQ | 10.5 pt | 10 or 12 CPI or Proportional |
| Sans Serif | LQ | 7 pt | 15 CPI |
| Sans Serif | LQ | 10.5 pt | 10 or 12 CPI or Proportional |
| Prestige | LQ | 10.5 pt | 10 or 12 CPI |
| Script | LQ | 10.5 pt | 10 or 12 CPI |
| Script C | LQ | 10.5 pt | Proportional |
| Roman T | LQ | Scalable from 8 pt to 32 pt in 2 pt increments | Proportional |
| Sans Serif T | LQ | Scalable from 8 pt to 32 pt in 2 pt increments | Proportional |
Continuous Feeding
Standard Feeder: 100 sheets
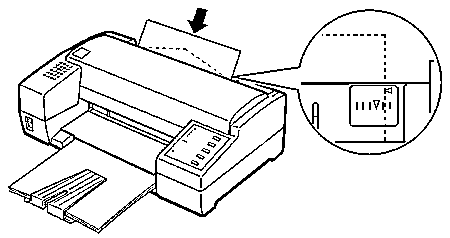
Loading paper in the paper feeder
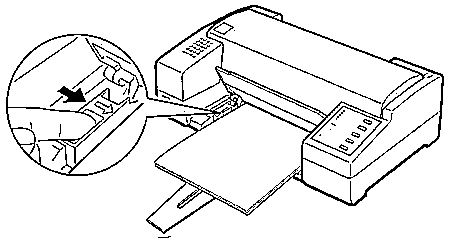
Manual Feeding
You can load single sheets of paper or envelopes form the manual feed slot without removing the paper supply from the paper feeder.
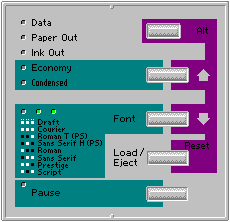
Default Settings Descriptions
Character table
Character tables contain the characters and symbols used by different languages. The printer prints text with the selected character table. When you select this feature, the font lights on the control panel go on or off to indicate the current selection.
Auto print direction
The printer ordinarily prints text bi-directionally for speed and prints graphics characters uni-directionally for precise vertical alignment.
When auto print direction is set to on, the printer switches automatically between bi-directional (for text data) and unidirectional motion (for graphics data). When this feature is set to off, the print head motion is controlled by your software.
Network interface mode
If your printer is connected to a single computer, leave this feature off. If you want to use the printer in a network environment and share it among multiple computers, set this feature to on.
When this feature is set to on, data may be present in the printer's buffer even though the printer is not continuously printing. Always make sure the data light is off before turning off the printer.
Mixed text/graphics mode
This feature is for software that has problems printing scalable font text combined with graphics. Leave the mixed text/graphics mode set to off if you do not notice any problems in your printout.
Auto line feed
When the auto line feed feature is on, each carriage return (CR) code is accompanied by a line feed (LF) code, If your printed text is unexpectedly double-spaced, set this feature to off. If text lines print on top of each other, set it to on.
Changing the default settings
To change the printer's default settings, you press the control panel buttons; the control panel lights show your selections.
Follow the steps below to make your changes:
| Default setting menu | data light | paper out light | ink out light |
| character table | off | off | on |
| network interface mode | off | off | blinking |
| mixed text/graphics mode | off | on | on |
| auto line feed | off | on | blinking |
For example, if you want to change the character table setting,
press the Alt button until the Data and Paper Out lights are off
and the Ink Out light is on.
4. Next, press the Font button the change the setting.

Parallel
Availability: Standard
Connection: Centronics Female
Activation: Default