 |
Language:
Epson ESC/P2 Speed: 5.5 MPP Graphics: 60,180,360, 720*dpi(only with special paper) Color InkJet Technology |
Internal Fonts
| Typeface | Quality | Height | Pitch |
| Draft | Draft | 7 pt | 15 CPI |
| Draft | Draft | 10.5 pt | 10 or 12 CPI |
| Courier | LQ | 7 pt | 15 CPI |
| Courier | LQ | 10.5 pt | 10 or 12 CPI |
| Roman | LQ | 7 pt | 15 CPI |
| Roman | LQ | 10.5 pt | 10 or 12 CPI or Proportional |
| Sans Serif | LQ | 7 pt | 15 CPI |
| Sans Serif | LQ | 10.5 pt | 10 or 12 CPI or Proportional |
| Prestige | LQ | 10.5 pt | 10 or 12 CPI |
| Script | LQ | 10.5 pt | 10 or 12 CPI |
| Script C | LQ | 10.5 pt | Proportional |
| Roman T | LQ | Scaleable from 8 pt to 32 pt in 2 pt increments | Proportional |
| Sans Serif T | LQ | Scaleable from 8 pt to 32 pt in 2 pt increments | Proportional |
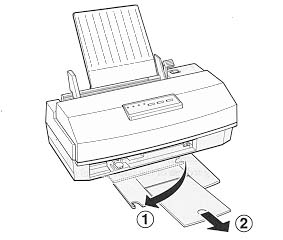
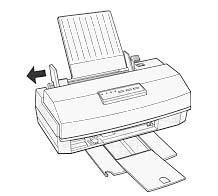
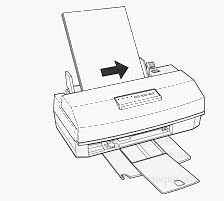
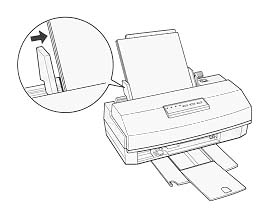
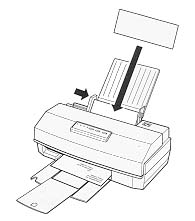
Continuous Feeding
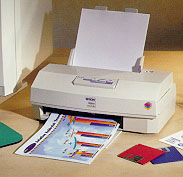
Standard Feeder: 100 sheets
You can load up to 100 sheets of plain paper in the sheet feeder. Be sure to load it with the printable surface facing up.
Default Settings Descriptions
Print direction
The printer has three settings: Uni-d, Bi-d, and Auto. Most software controls this setting. If your software does, you may never need to set it with the control panel.
Uni-d causes the print head to print in one direction only. This provides maximum alignment for both graphics and character printing.
Bi-d causes the print head to print in both directions. This provides the fastest printing. If vertical lines re not aligned, calibrate your printer according to the directions in the user's manual.
When Auto is selected, the printer switches automatically between bi-directional (for text data) and unidirectional (for graphics data).
Network interface mode
If your printer is connected to a single computer, leave this feature off. If you want to use the printer in a network environment and share it among multiple computers, set this feature to on.
When this feature is set to on, data may be present in the printer's buffer even though the printer is not continuously printing. Always make sure the data light is off before turning off the printer.
Auto line feed
When the auto line feed feature is on, each carriage return (CR) code is accompanied by a line feed (LF) code, If your printed text is unexpectedly double-spaced, set this feature to off. If text lines print on top of each other, set it to on.
Loading position
When you want to print more lines on a page, set this feature to 3mm. If you set the top margin with your software, that setting is added to the default-setting value.
Interface mode
You may need to select the interface for the printer to communicate properly with your computer.
The Epson Stylus Color has both a parallel and serial interface. If you install an optional interface card in its interface slot, you can use up to three interfaces.
When you select Auto Selection, the printer automatically selects the interface that is receiving data, and uses that interface until the end of the print job. (A print job ends when no data is received from the selected interface for the amount of time specified in the Auto interface wait mode setting described below.) This auto interface selection allows you to share the printer with up to three computers.
If you don't know what type of interface your computer requires, check your computer manual.
Auto interface wait mode
When you select Auto I/F mode in the Interface mode option, you can set interface time-out to 10 seconds or 30 seconds.
The printer does not accept data from another interface unless it receives no data from the current interface for the period set in I/F time-out.
Character table
Character tables contain the characters and symbols used by different languages. The printer prints text with the selected character table.
Changing the default settings
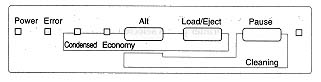
To change the printer's default settings, you use the control panel buttons the control panel lights show your selections.
1. Make sure the printer is turned off and paper is loaded in the sheet feeder.
2. Hold down the
Economy/Condensed button and turn on the printer to enter the
default-setting mode.
The printer loads a sheet of paper and prints a brief summary and
instructions. It instructs you to select the language that you
want messages printed in. (English, French, German, Italian or
Spanish).
3. Press the Font button
until the Font lights indicate the language of your choice; then
press the Alt button to make your selection.
Language Font
English Courier
French Roman T(PS)
German Sans Serif H (PS)
Italian Roman
Spanish San Serif
After you press the Alt button, the printer prints the current
default settings and the next instruction in the language you
selected.
4. To move to the feature
you want to change, press the Font button until the Courier,
Roman T (PS), and Sans Serif H (PS) lights indicate the
appropriate selection.
| Menu | Courier light | Roman T light | Sans Serif light | |
| Print direction | on | off | off | |
| Network interface mode | off | on | off | |
| Auto line feed | on | on | off | |
| Loading position | off | off | on | |
| Interface mode | on | off | on | |
| Auto interface | off | on | on | |
| Character table | on | on | on |
For example, if you want to change the loading position setting, press the Font button until the Courier and Roman T lights are off and the Sans Serif H light is on.
| Menu | Settings | Operate light | Data light | Paper out light | |
| Print direction | Auto | on | off | off | |
| Bi-d | off | on | off | ||
| Uni-d | off | off | on | ||
| Network interface mode | off | off | off | off | |
| on | on | off | off | ||
| Auto line feed | off | off | off | off | |
| on | on | off | off | ||
| Loading position | 3mm | off | off | off | |
| 8.5mm | on | off | off | ||
| Character Table | Italic USA | off | off | off | |
| Italic France | on | off | off | ||
| Italic Germany | blinking | off | off | ||
| Italic UK | off | on | off | ||
| Italic Denmark | on | on | off | ||
| Italic Sweden | blinking | on | off | ||
| Italic Italy | off | blinking | off | ||
| Italic Spain | on | blinking | off | ||
| PC 437 | blinking | blinking | off | ||
| PC 850 | off | off | on | ||
| PC 860 | on | off | on | ||
| PC 863 | blinking | off | on | ||
| PC 865 | off | on | on | ||
| PC 861 | on | on | on | ||
| BRASCII | blinking | on | on | ||
| Abicomp | off | blinking | on | ||
Parallel
Availability: Standard
Connection: Centronics Female
Activation: Default