 |
Languages: none Technology: 9-pin impact dot matrix. Speed: High-speed draft (10 pitch) 533cps, Normal draft (10 pitch) 400cps, NLQ (10 pitch) 80cps, Draft (12 pitch) 480cps, NLQ (12 pitch) 96cps. Emulations: Epson FX-850/1050, FX-86e/286e, FX-85/185, FX-80/100, EX-800/1000, FX, LX, Epson printer, 9-pin printer, Standard printer, and Draft printer. |


Internal Typefaces: High-speed Draft, Normal Draft, NLQ Roman, and NLQ Sans Serif.
Each typeface is available in 10, 12, and proportional pitch (High-speed Draft is available only in 10 pitch).
Standard Feeders: Tractor-fed paper
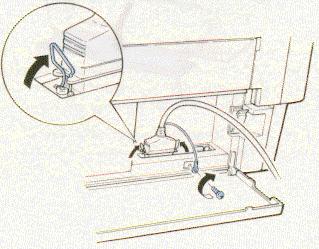
1. Open the printer's front
cover by lifting its bottom edge up and toward you.
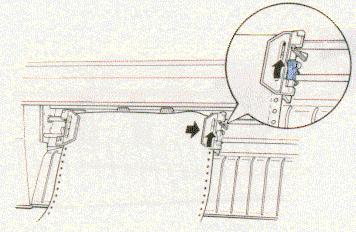
2. Release the sprocket lock levers on both the right and left
sprocket units by pulling each lever.
3. Slide the left sprocket unit all the way to the left. Lock it
into place by pushing the sprocket lock lever up.
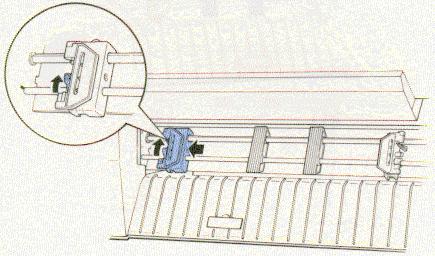
4. Now slide the right sprocket unit to approximately match the
width of your paper. (Do not lock it into place yet.)

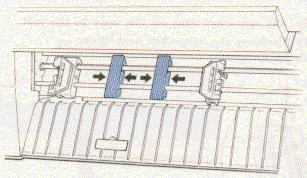
5. Slide the two paper supports so that they are spaced evenly
between the sprocket units.
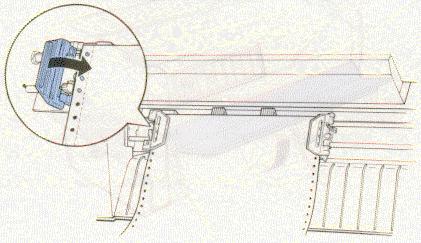
6. Open both sprocket covers.
7. Be sure your paper has a clean, straight edge, and then fit
the first five holes in the paper over the pins of the sprocket
units as shown below. The side of the paper that you want to
print on should be facing you. Now close the sprocket covers.
8. Slide the right sprocket unit so that the paper is straight
and has no wrinkles. Lock the sprocket unit in place by pushing
the sprocket lock lever up.
9. Close the printer's front cover.
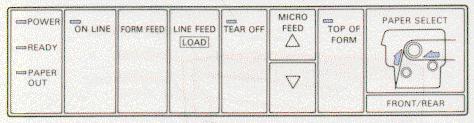
10. Turn on the printer. The print head moves to the middle of
the printer and the POWER and PAPER OUT light come on. Also,
either the front or rear tractor arrow on the PAPER SELECT
indicator lights up.
11. Press the LINE FEED/LOAD button to load your paper. (IF the
paper does not load, the front tractor may not be selected. Press
the FRONT/REAR button to select the front tractor. This loads the
paper automatically.)
12. After the paper loads, turn off the printer.
DIP Switch Settings
DIP Switch 1
| Selector | Function | Switch ON | Switch OFF | Factory Setting | Switch View ON | Switch View OFF |
| 1-1 | Condensed mode | Condensed | Normal | OFF | ||
| 1-2 | Slashed zero | Slashed | Not Slashed | OFF | ||
| 1-3 | Character table | Graphics | Italics | OFF | ||
| 1-4 | Input buffer | OFF | ON | OFF | ||
| 1-5 | NLQ or Draft mode | NLQ | Draft | OFF | ||
| 1-6 | OFF | |||||
| 1-7 | International character set | See Country subtable | See Country subtable | OFF | ||
| 1-8 | OFF |
DIP Switch 2
| Selector | Function | Switch ON | Switch OFF | Factory Setting | Switch View ON | Switch View OFF |
| 2-1 | Page length | Condensed | Normal | OFF | ||
| 2-2 | Draft printing speed | Slashed | Not Slashed | OFF | ||
| 2-3 | Skip over perforation | Graphics | Italics | OFF | ||
| 2-4 | Auto line feed | OFF | ON | OFF | ||
| 2-5 | OFF | |||||
| 2-6 | Interface type/parity | See Interface subtable | See Interface subtable | OFF | ||
| 2-7 | OFF | |||||
| 2-8 | Baud Rate | See Baud Rate subtable | See Baud Rate subtable | OFF |
Country subtable
| Country | Switch 1-6 | Switch 1-7 | Switch 1-8 | Factory Setting | Switch View | |
| USA | OFF | OFF | OFF | YES | ||
| France | OFF | OFF | ON | NO | ||
| Germany | OFF | ON | OFF | NO | ||
| UK | OFF | ON | ON | NO | ||
| Denmark | ON | OFF | OFF | NO | ||
| Sweden | ON | OFF | ON | NO | ||
| Italy | ON | ON | OFF | NO | ||
| Spain | ON | ON | ON | NO |
Interface subtable
| Interface type | Parity | Switch 2-5 | Switch 2-6 | Factory Default | Switch View | |
| Parallel | OFF | OFF | YES | |||
| Serial | Odd | OFF | ON | NO | ||
| Serial | Even | ON | OFF | NO | ||
| Serial | None | ON | ON | NO |
Baud rate subtable
| Baud Rate | Switch 2-7 | Switch 2-8 | Factory Default | Switch View | |
| 9600 bps | OFF | OFF | YES | ||
| 4800 bps | OFF | ON | NO | ||
| 1200 bps | ON | OFF | NO | ||
| 300 bps | ON | ON | NO |
| INDICATOR LIGHT | MEANING |
| POWER | On when the POWER switch is on and power is supplied to the printer. |
| READY | On when the POWER switch is on and power is supplied to the printer. |
| PAPER OUT | On when the printer is out of paper. |
| ON LINE | On when the can receive and print data from the computer. |
| TEAR OFF | On when the printer is in tear-off mode. |
| TOP OF FORM | On when the printer is in top of form mode. |
| PAPER SELECT | FRONT TRACTOR
ARROW: Green when the front tractor is selected and paper
is loaded. Red when the front tractor is out of paper. REAR TRACTOR ARROW: Green when the rear tractor is selected and paper is loaded. Red when the rear tractor is out of paper. |
| INDICATOR LIGHT | MEANING |
| ON LINE | Controls the printer's on line/off line status. |
| FORM FEED | Advances paper to the top of the next page when the printer is off line. |
| LINE FEED/LOAD | Advances paper one line when the paper is off line. (Feeds paper continuously if the button is held down.) This button can also be used to load paper when the printer is on line. |
| TEAR OFF | Advances paper to its tear-off position and then feeds the paper back to the top of form position. |
| MICRO FEED | Advances or reverses paper in 1/216-in increments when the printer is off line. These buttons are used to adjust the top of form and tear-off positions. |
| TOP OF FORM | Enters and exits the top of form mode when the printer is off line. |
| FRONT/REAR | Selects the front or rear tractor. |
Parallel
Availability: Standard
Connection: Centronix Parallel
Serial
Availability: Standard
Connection: RS232C 25pin serial